Frequently asked questions
Using Kaltura
-
Can I use the Kaltura platform in Canvas as well?
Yes, the Kaltura video platform is compatible with Canvas and gives you access to your own video footage as well as allowing you to record, store and share videos from within Canvas.
-
Can I upload content to Kaltura from my mobile?
The UvA’s Kaltura MediaSpace environment can also be accessed via the KMS GO for regions app:
Make sure you install the right app! The correct app is KMS GO for regions, not Kaltura MediaSpace Go. Install the App, click on ‘Enter URL’ or ‘your site’ and enter https://video.uva.nl/. Now log in using your UvAnetID and password. You now have access to the UvA’s Kaltura MediaSpace environment. Click on Home, followed by the plus icon in the lower right-hand section. The various options for creating and uploading audio, images and recordings will now be displayed.
-
I'm using Kaltura in Safari (browser) and recording video is not working, what am I doing wrong?
Kaltura does not (yet) work optimally in Safari, especially when recording Express Capture. Preferably use Google Chrome as browser.
-
Can I upload material to Kaltura without using Canvas?
Yes, you can. In addition to the Canvas portal, you can also access the Kaltura MediaSpace video portal at https://video.uva.nl/. Think of this platform as UvA’s very own YouTube channel. Users can upload private content. They will need to log in using a UvAnetID.
-
Can I use Kaltura for my research images?
Yes, you can. In this case, make sure to access the service through video.uva.nl.
-
Can I embed videos from Kaltura on my own website?
Yes, you can. To do so, go to My Media,
- Click on the video you want to embed on your own website.
- Click on Share.
- Click on Embed to copy the code, which you can then paste to the website or other platform where you want to embed your video.
You will have to publish your video as Unlisted first in order to share it this way.
My Media
-
Can I manage and organise my own video library by creating playlists, channels, etc.?
Yes, you can use labels and descriptions to organise your media. You can also include metadata in various ways.
-
Where can I find my own videos?
Option 1:
- Go to a Canvas course.
- Open the My Media menu.
Option 2:
- Log in to video.uva.nl.
- Select My Media.
-
Can I download my own videos?
You can download your own videos. If you have made the video then you are the owner of the video. Then there is a possibility to download it via Canvas and via the portal video.uva.nl. If you are not the owner of the video then it is not possible to download it.
Via Canvas
At the bottom of the video's bar you will find a download button.
Via the portal video.uva.nl
Steps:
- Go to My Media.
- Go to the (owned) video you want to download.
- Make sure the video is set to Private.
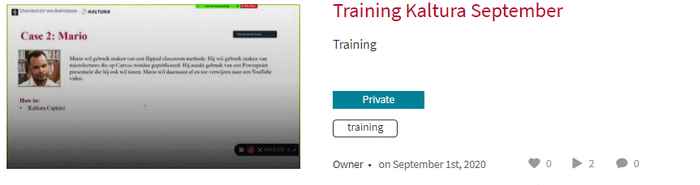
- If the video is on Private, click on the pencil icon next to the video.

Then you get to the edit area and go to downloads. There you select the option that downloads are available. In what format is up to you. Then click on Save.
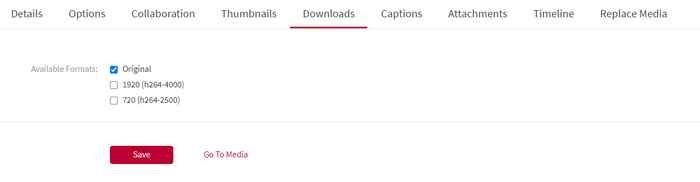
Then press Go To Media. Next to the Save button. Then you will come to the area of the video and you will get the Download button. Now you can download the video.

-
Is there a search function, and how does it work?
In several places you will find the icon with the magnifying glass. This is the search function. You can search for any terms from the 'details' of your video, such as the name, description, tags, etc. If your videos have captions, you can also search for words from the captions. If you search in My Media and Media Gallery, you can use filters to filter and sort your videos.
-
Can I search for/view/use videos uploaded by other users?
Yes, videos can be searched via Search at the top right of the portal.
Videos of others can only be seen if you are Co-Editor, Co-Publisher or Co-Viewer, this is determined by the owner of the video. You can determine this at My Media > Edit (pencil) > Collaborations > Media Collaborators.

Using other people's videos is possible if you are Co-Publisher of the video, as described above.
-
Can I set my videos to private? How do I do that?
Video files used in your Canvas course will only be visible within the course. If you are using videos uploaded through video.uva.nl, you can determine whether they should be public or private when publishing to Channels.
You can use Channels > +Create Channel to create a Channel, which can then be set to Private and shared exclusively with specific individuals. Once you have saved the Channel, you can add specific users on the Users tab and assign them an appropriate role:
- Member: exclusively has View permissions.
- Contributor: has View permissions and may add videos.
- Moderator: has View permissions, may add videos and is assigned the role of Channel Moderator.
- Manager: has View permissions, may add videos and is assigned the roles of both Channel Moderator and Channel Manager (authorised to assign specific roles and permissions to others).
Click on Back to Channel and add the videos using the +Add to Channel button.
-
Can I make my videos public (accessible to everyone)?
Yes, you can do so via My Media.
- Select My Media.
- Click on the relevant video.
- Select the Publish option in the Actions menu.
- Select the Unlisted option.
- Click on Save.
You can also make your videos available by uploading them to a Channel. To do so, log in to video.uva.nl.
- Click on Channel, followed by +Create Channels.
- Under Private, select Public, Restricted.
- Click on Save.
Uploading files
-
Is there a possibility to add 360-degree videos in Kaltura?
Yes, this is possible. You can do this if you add ‘360’ as a tag on your video (without the quotes), when you upload the 360-degree video (you can add tags under Details, where you also give your video a name and description).
-
I just uploaded a knowledge clip on Canvas. The quality, however, has been reduced after I uploaded. Why is this?
It might take a while before the video will be visible in HD quality. Six different versions of your video will be rendered, so your video is optimised for all internet connections.
The first file that is visible after uploading, will be of low quality. Depending on the length of the video, it might take a while before the video will be visible in HD quality.
-
What is the maximum size of a file I can upload?
There is no maximum size per file that you can post. Keep in mind that the larger a file is the longer it will take to upload. Kaltura recommends a format of 1280x720 pixels and using the H.264 video codec at about 4000 kb/s. Kaltura accepts all common file formats for video, audio and images.
-
Can I upload audio clips or photos as well as videos?
Yes, you can. Select Media Upload in Canvas to upload all common video, audio and image formats.
-
How long will it take for my video to finish uploading?
The duration of uploading depends on the file size of the video images. In general, uploading a video takes around 1.5 times the recording time.
Metadata
-
What should I enter in the details (metadata) of a video on Kaltura?
Name (required)
At Name (required) you give the video a name. This is a required field.
Description
The Description field gives the video a description that will appear below the name. This is a required field.
Tags
With Tags you can enter the video tags, keywords that characterize the video. By making good use of tags you can categorize videos and thus easier navigate in My Media or the Media Gallery of a course. For example, you could give summarizing videos the tag 'summary', or 'case study' for all videos dealing with a case study.
Confidential Media (required)
When you work with privacy sensitive material, select YES.
Language
At Language you select the language of the video. This is a required field.
Author
At Author you give the name of the creator of the video. In most cases this is the person who uploaded the video to Kaltura.
Department
In Department, select the department to which the target group of the video belongs. This is a required field.
Original ID
At Original ID you do nothing. Videos that have migrated from the Streaming Media Service have an original ID in this field. Do not delete this field! For a new video, this field is empty and you do not have to enter anything.
Publishing Schedule
At Publishing Schedule you indicate whether the video should always be visible on the locations where it is published, or only in a certain period.
-
Why do I need to enter the details (metadata) of a video on Kaltura?
All the details (metadata) you enter with a video can be used as a search term in My Media or the Media Gallery of a course to find this video. This way, students can also easily find a video. This is especially important when there are large numbers of videos on Kaltura. Thus, filling in the details (metadata) increases findability, searchability and the ability to share material.
Kaltura Capture
-
My video runs asynchronous after recording with Kaltura Capture (Apple devices)
This has to do with an old version of Kaltura Capture that is not automatically updated on some devices. To fix this, the old Kaltura Capture Software needs to be removed from the device and the new (Beta) version needs to be downloaded for your Apple or Windows device.
-
Where can I find Kaltura Capture in Canvas?
Kaltura Capture can be found at My Media > Add New. Kaltura Capture does not appear when you want to record a video in the Media Gallery of a course.
-
Kaltura Capture opens by itself without me doing anything, how do I fix this?
Kaltura Capture should be completely closed after the program is used, for Apple or Windows computers the solution is as follows:
Apple: In the application bar (at the bottom of the screen), click (with two fingers) on Kaltura Capture -> choose 'Stop'.
Windows: In the lower right corner of the application bar, click on "^". Kaltura Capture can be closed by right-clicking on the icon. The exit/quit option will come up, this will close the program completely.
-
Why don't I see Kaltura Capture listed in the +Add New Menu?
Make sure you are logged in. If Kaltura Capture still does not appear then, it may be due to one of the following reasons:
Kaltura Capture only works on a Windows and Mac computer. If you have a Linux system then it will not work. There is no recording option in Kaltura Capture, however, Kaltura can be further used for, for example, playing or editing videos.
-
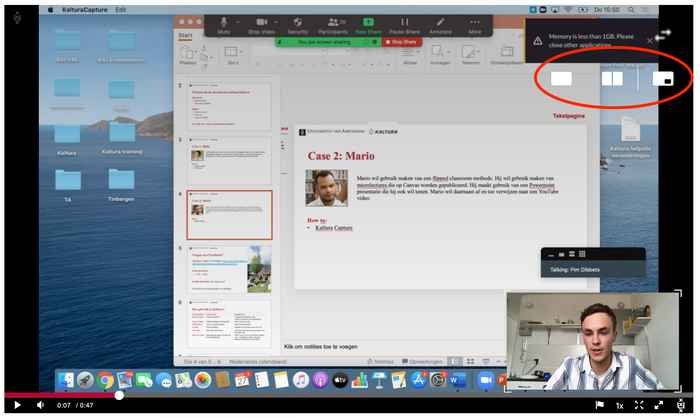
How can you as a viewer determine which multi-screen screen you are viewing (in Kaltura Capture)?
With a multi-screen shot, you as viewer can determine which of the screens you see big/small or not. At the top righthand corner of your screen, highlighted in red, you can choose whether you want to see (from left to right) only one screen, both screens the same size, or one small and the other large.
Then you can switch screens with the two arrows (top).
Privacy
-
Where can I find Kaltura's privacy policy?
Kaltura is a video platform in the Cloud and the UvA uses the European data center in Ireland, thus complying with European and Dutch privacy legislation (GDPR). The Kaltura privacy policy can be found in the footer of the UvA Kaltura platform.
The direct link is: https://corp.kaltura.com/privacy-policy/. Additional information about GPDR can be found here: https://corp.kaltura.com/blog/kalturas-compliance-gdpr/.
-
I want to store privacy-sensitive material, is this video platform safe?
Yes, although it is only possible to store privacy-sensitive material if you need to submit it in a Canvas assignment. If you like to upload privacy-sensitive material, go to the Edit-mode, Details and select YES at the Confidential Media tab. This workaround will make sure that your material will be protected from unwanted publication and will be safe to use.
Remaining questions
If you have any questions you can contact the Service Desk ICT Services via:
E: servicedesk-icts@uva.nl
T: +31 (0)20 525 1402
For additional information please also look at the Knowledge Centre of Kaltura